Setting Up Telenet MAC Bridging with pfSense
In this post, I will show how I enabled MAC bridging on a Telenet modem/router so that my own pfSense firewall can manage the home/lab network directly. The goal is simple: remove double NAT and let pfSense become the real edge firewall.
My Starting Topology
This was my starting point before enabling MAC bridging:
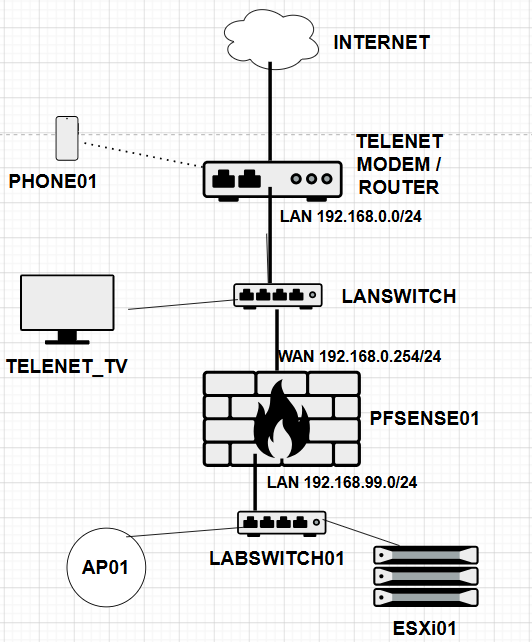
| Device | Role | Relevant addressing |
|---|---|---|
| Telenet modem/router | ISP modem/router and default Wi-Fi | LAN: 192.168.0.1/24Public WAN IP: example 84.93.102.45SSID: Telenet651641 |
| LAN switch | Switch for devices on the default Telenet LAN | Network: 192.168.0.0/24 |
| PFSENSE01 | My own firewall/router | WAN before bridging: 192.168.0.254/24LAN: 192.168.99.0/24 |
| LABSWITCH01 | Switch for lab devices | ESXi, Wi-Fi AP, Raspberry Pi and other lab devices |
The important part is the pfSense WAN address. Before bridging, the pfSense WAN interface had a private IP address from the Telenet modem/router. That means devices in my lab were behind double NAT: first NAT on pfSense, then another NAT on the Telenet modem/router.
| Component | Before MAC bridging | After MAC bridging |
|---|---|---|
| Telenet modem/router | Routes/NATs your traffic and gives pfSense a private WAN IP. | Still exists, but the selected downstream router receives the public IPv4 service. |
| pfSense WAN | Private IPv4, for example 192.168.0.254/24. | Public IPv4 directly on the WAN interface. |
| NAT path | Double NAT: pfSense NAT + Telenet modem NAT. | Single NAT: pfSense is the main edge firewall. |
| IPv6 | Depends on modem/router behavior. | pfSense can request IPv6 DHCPv6 Prefix Delegation and advertise routed /64 prefixes to LAN/VLANs. |
Why Double NAT Is Annoying
Let us use a simple example. A laptop with IP address 192.168.99.10 wants to browse to gklablocal.com over HTTPS.
The packet first leaves the laptop like this:
LAPTOP [X] -> PFSENSE01 -> TELENET_MODEM -> INTERNET

Source IP:      192.168.99.10
Destination IP: 185.215.167.13
Source Port:    56874
Destination Port: 443
When the packet reaches pfSense, pfSense stores the state and translates the source IP address. The packet then leaves the pfSense WAN interface towards the Telenet modem/router:
LAPTOP -> PFSENSE01 [X] -> TELENET_MODEM -> INTERNET

Source IP:      192.168.0.254
Destination IP: 185.215.167.13
Source Port:    34814
Destination Port: 443
The Telenet modem/router then performs NAT again before sending the packet to the internet:
LAPTOP -> PFSENSE01 -> TELENET_MODEM [X] -> INTERNET

Source IP:      84.93.102.45
Destination IP: 185.215.167.13
Source Port:    12814
Destination Port: 443
That is double NAT: two separate state tables, two timeout domains, two places where inbound traffic can fail, and two devices that may interfere with protocols that do not like NAT. In my NAT series, I explain these disadvantages in more detail.
By enabling MAC bridging, pfSense receives the public IPv4 address directly on its WAN interface. This removes one NAT layer and makes pfSense the single device responsible for firewalling, NAT, port forwards and troubleshooting.
What You Need to Know Before Enabling MAC Bridging
Your Public IP Address Will Change
When you enable MAC bridging, your current public IP address will most likely change. This is not something I found clearly documented, but it happened in all three installations where I enabled this mode. Business customers with a fixed public IP may behave differently.
The Default Telenet LAN and Your pfSense LAN Become Separate Networks (with each their own public IPv4-address)
Your default Telenet Wi-Fi network continue to work after enabling MAC bridging. However, clients connected directly to the Telenet modem/router will not be on the same network as the clients behind pfSense. The clients behind the router/firewall will have a DIFFERENT IPv4 address than the ones using the Telenet Wi-Fi network or are cabled to the TELENET Modem
In other words, devices on the default Telenet network, for example 192.168.0.0/24, and devices behind pfSense, for example 192.168.99.0/24, should be treated as separate routed networks. They will not be able to reach each other.
- IPv4: pfSense is no longer just a normal RFC1918 client behind the modem. It becomes the selected downstream WAN endpoint.
- IPv6: the modem-side network and the pfSense LAN/VLAN networks use different prefix domains. Neighbor Discovery and on-link behavior only apply inside their own link/prefix boundary.
- Operational impact: think of the modem side and the pfSense side as separate worlds, not as one large flat Ethernet network.
What Changes Technically
- pfSense receives a public IPv4 address on its WAN interface through MAC bridging.
- pfSense receives an IPv6 WAN address through DHCPv6.
- pfSense can request an IPv6 delegated prefix from Telenet, for example a
/57, and then use that prefix for internal LAN/VLAN networks. - The normal Telenet modem/router functions, such as the default Wi-Fi and TV services, can continue to work separately.
IPv6 Prefix Delegation: /57 to /64 Calculation
Telenet provides a DHCPv6 Prefix Delegation size of /57 in this setup. For normal LAN/VLAN networks, you usually assign a /64 per interface or VLAN.
Target LAN subnet size: /64
ISP delegated prefix:   /57

Difference:
64 - 57 = 7 bits
Those 7 bits are the subnet bits you can use.
Number of /64 subnets = 2^7
                      = 128
So a /57 gives you 128 separate /64 networks.
/57 = 128 × /64 networks

Prefix ID 0x00 = first /64
Prefix ID 0x01 = second /64
Prefix ID 0x02 = third /64
...
Prefix ID 0x7f = last /64
0x7f is 127 in decimal. Because counting starts at 0, the range 0 through 127 gives 128 total values.
/57, pfSense can use prefix IDs from 0x00 through 0x7f. Use a different prefix ID for each IPv6-enabled LAN or VLAN.ISP Port Blocking Still Applies
MAC bridging does not magically remove ISP-level port filtering. At the time of writing, the following inbound ports are commonly blocked on this type of residential connection:
| Protocol | Blocked inbound ports |
|---|---|
| TCP | 25, 53, 135, 137, 139, 161, 162, 445, 1080 |
| UDP | 53, 135, 137, 139, 161, 162 |
Check Whether Your Modem Supports MAC Bridging
Before changing anything, verify that your Telenet modem supports MAC bridging. Log in to MyTelenet, go to My Products, and open the settings for your home network.
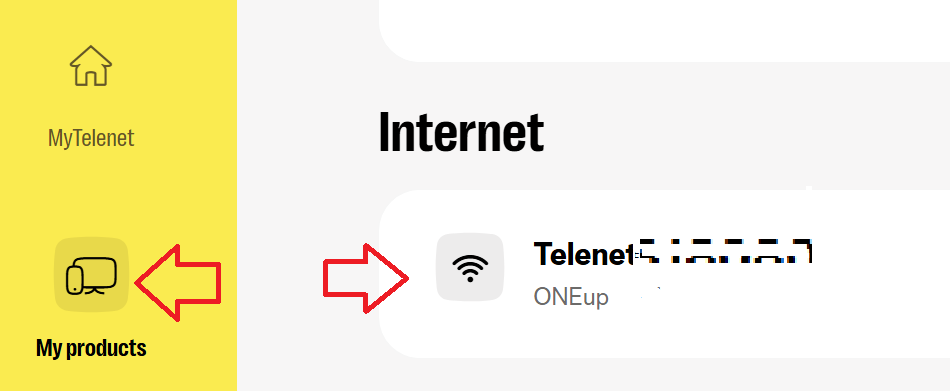
Click Settings under your home network.
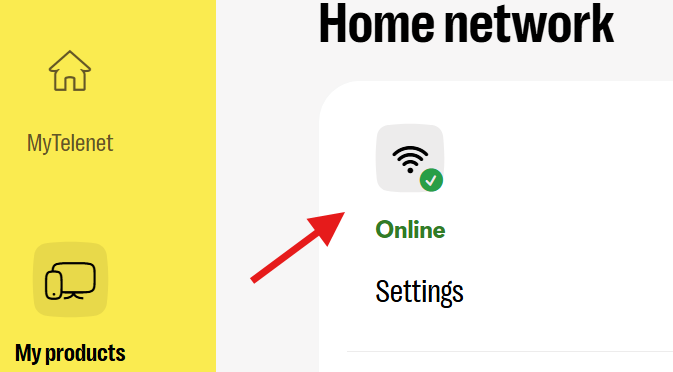
Expand Modem and go to the advanced settings.
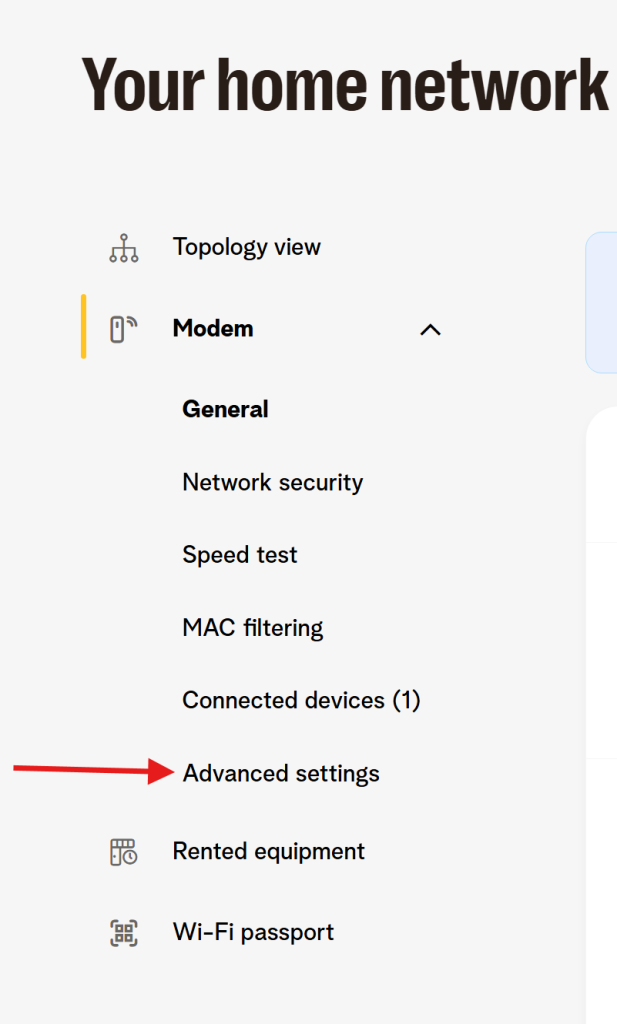
Unlock the expert settings and confirm the warning.
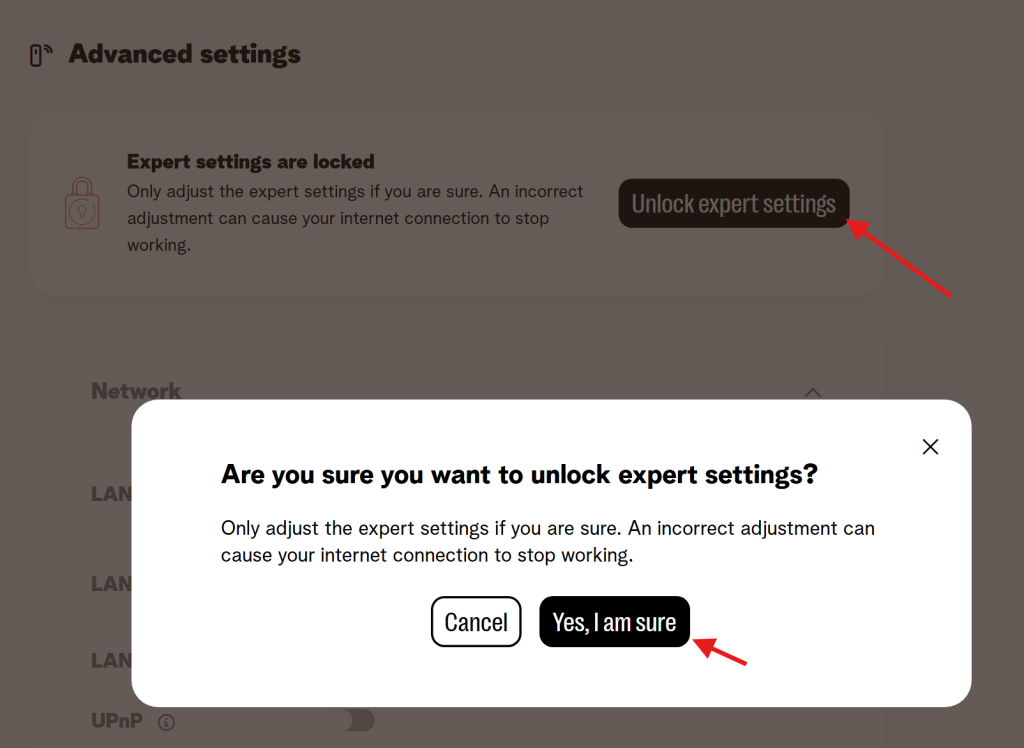
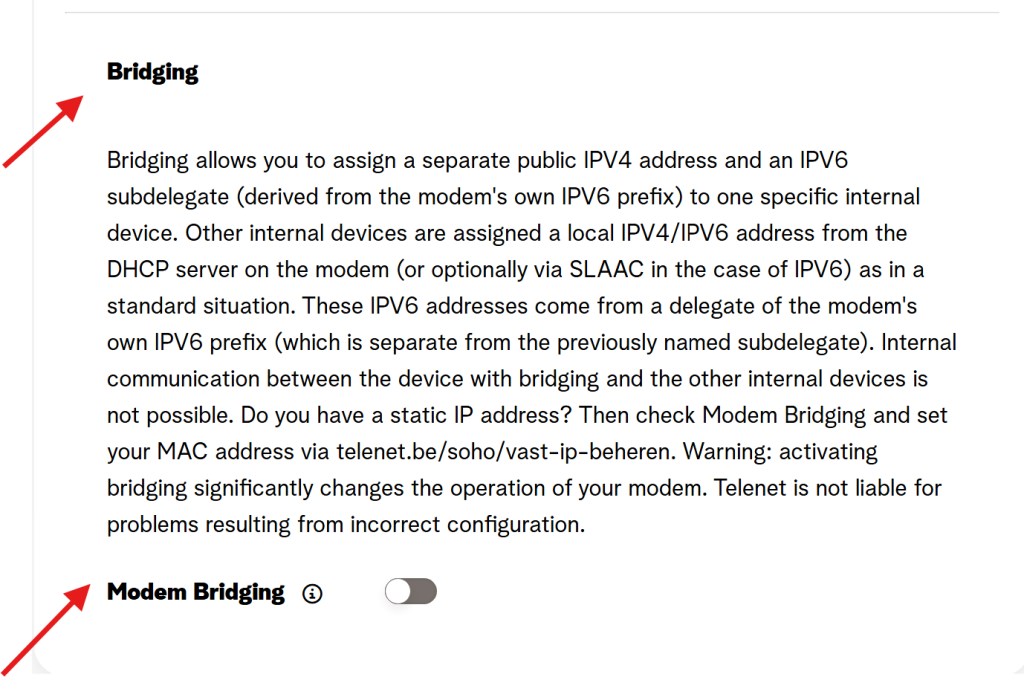
Check whether the Bridging option is available.
In my case, I use the F@ST3896LG-TN modem.
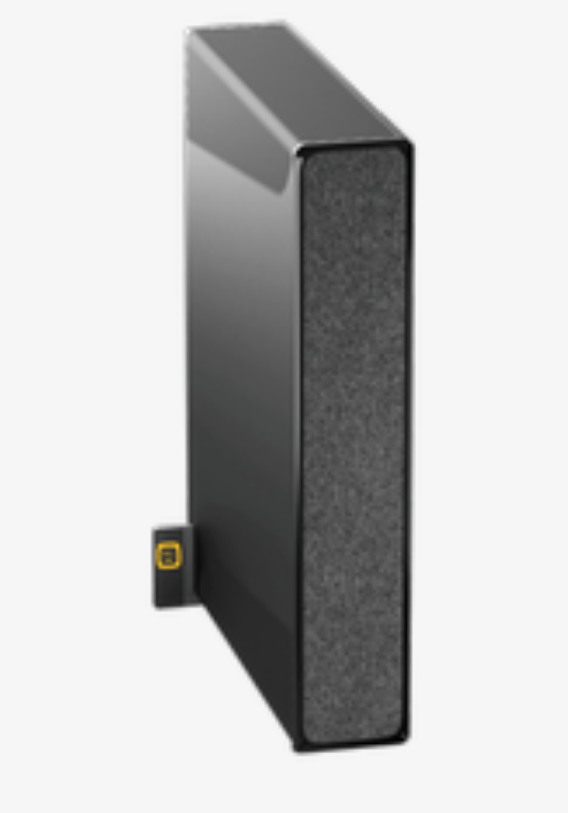
Based on my checks at the time of writing, this is the modem compatibility overview:
| Modem | Picture | MAC bridging support | Notes |
|---|---|---|---|
| F@ST5685LGB-TN (Fiberbox) | | No | Possibly supported in a future firmware update; confirm in MyTelenet. |
| F@ST3896LG-TN | | Yes | This is the modem used in this guide. |
| CH8568LG |  | No | Confirm with Telenet before replacing hardware. |
| CV8560E | 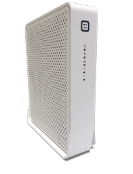 | Yes | Known to support MAC bridging. |
| CH7465LG-TN | 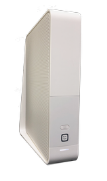 | No | Not suitable for this guide. |
| CH6643E | 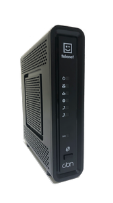 | No | Not suitable for this guide. |
Preparation
Switching from DMZ-host mode to MAC bridging has a real impact. Prepare the change before you enable it, especially if other people rely on the internet connection.
Review Your Firewall Rules and NAT Rules
After enabling MAC bridging, pfSense is directly exposed to the internet on its WAN interface. That is exactly the goal, but it also means your WAN firewall rules matter even more.
Connect the Devices Correctly
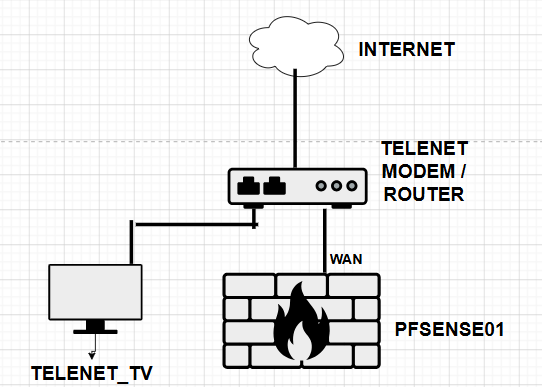
For a simple and safe setup, connect the pfSense WAN interface directly to one of the yellow LAN ports on the Telenet modem. Use a good-quality Cat6 or better cable.
If you have a Telenet TV box or decoder connected with Ethernet, keep that device connected directly to the Telenet modem as well.
After changing the cabling, the top part of my topology looks like this:
Know the WAN MAC Address
MAC bridging is linked to the MAC address of your router/firewall WAN interface. In my case, I use pfSense, so I checked the WAN MAC address under Interfaces > WAN:

If possible, avoid MAC spoofing for this setup. If a spoofed MAC address is accidentally removed or changed later, the bridge assignment can stop working.
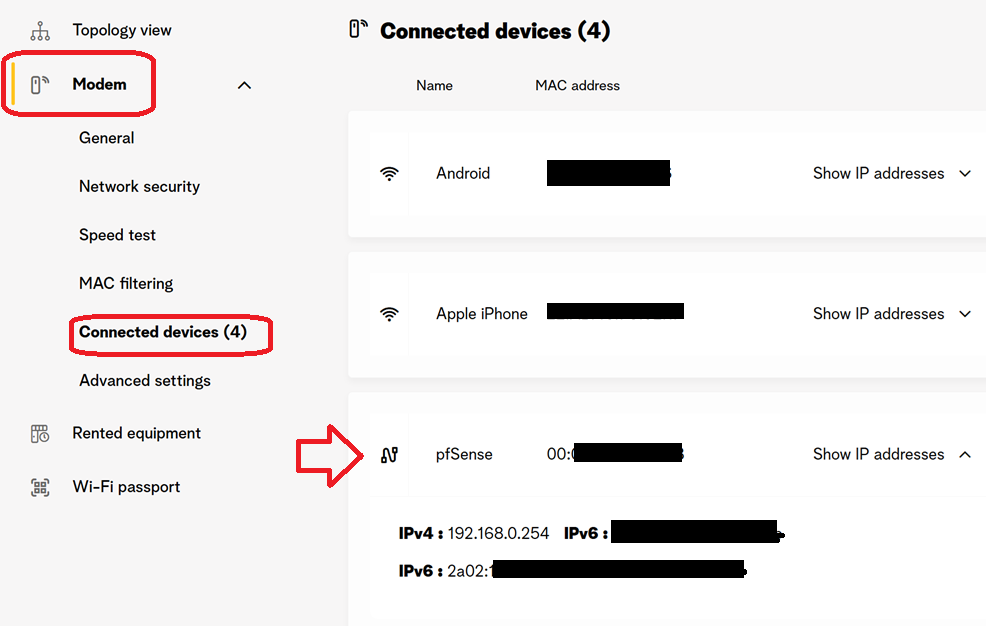
In MyTelenet, verify that your router/firewall appears in the list of connected devices with the expected MAC address.
Run a Baseline Speed Test
Before making changes, run a quick speed test and note the result. This gives you a baseline to compare against after MAC bridging is enabled.
Plan Downtime
Plan a short maintenance window. Your internet connection may go down while you change the modem setting, reboot devices and renew the WAN lease on pfSense.
Enable MAC Bridging
Step 1: Set the pfSense WAN Interface to DHCP
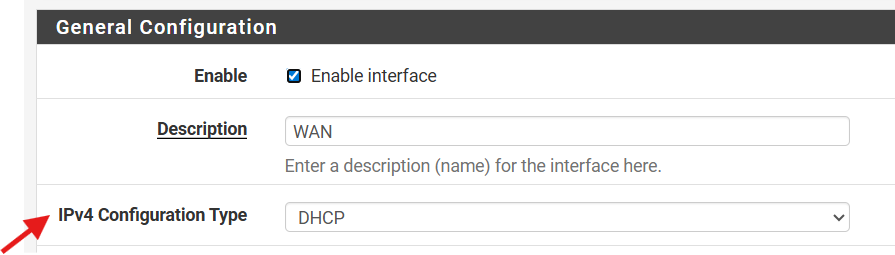
The pfSense WAN interface must receive its IPv4 address through DHCP. In pfSense, go to Interfaces > WAN and set the IPv4 configuration type to DHCP.
Step 2: Enable MAC Bridging in MyTelenet
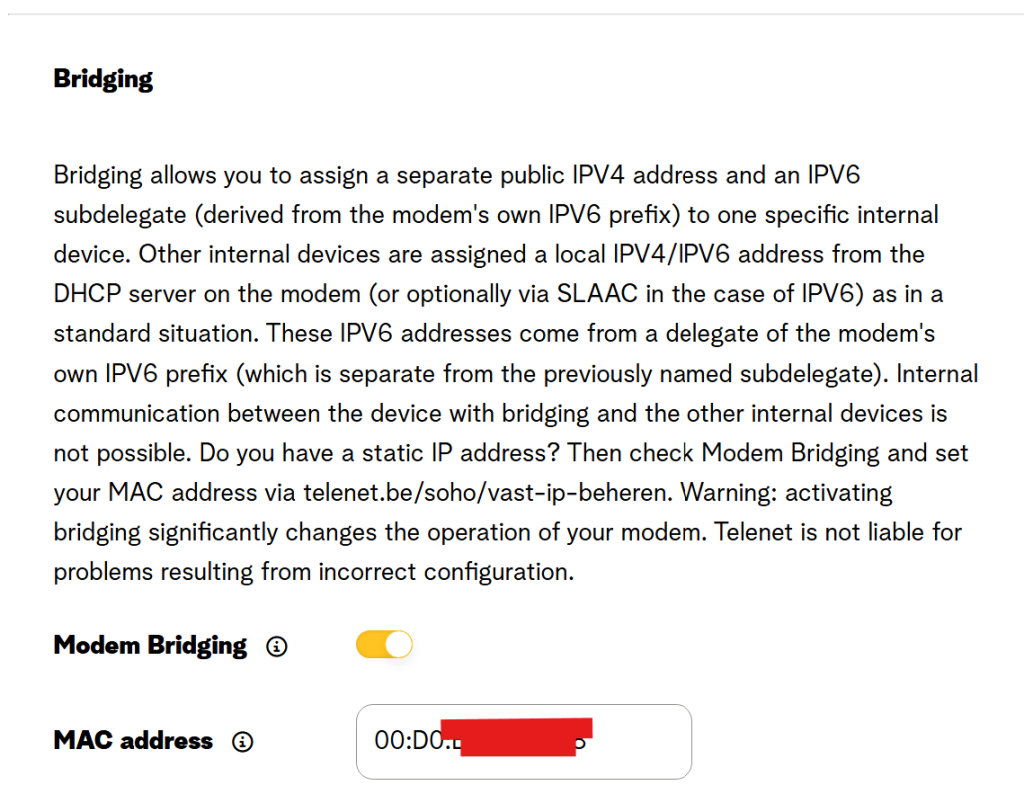
In MyTelenet, expand Modem, open the advanced settings and unlock the expert settings.
Enable MAC Bridging and enter the MAC address of the pfSense WAN interface.
Step 3: Disable DMZ-Host Mode
If DMZ-host mode was previously enabled, disable it. You do not want DMZ-host mode and MAC bridging fighting each other.
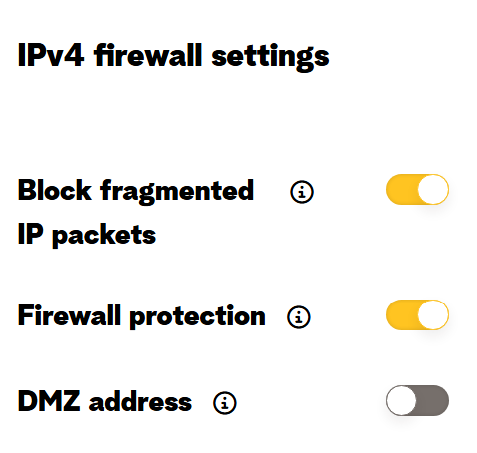
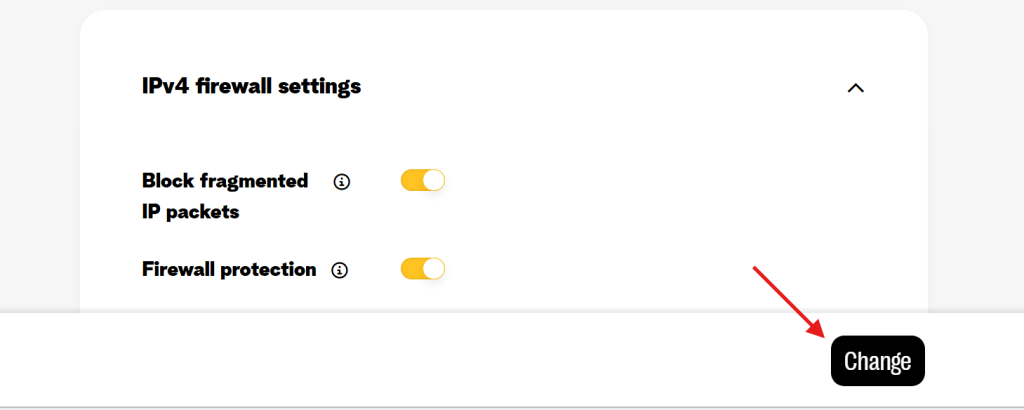
Click the change/apply button. This step is easy to forget.
After applying the setting, lock the expert settings again.
Step 4: Reboot and Verify the WAN Address
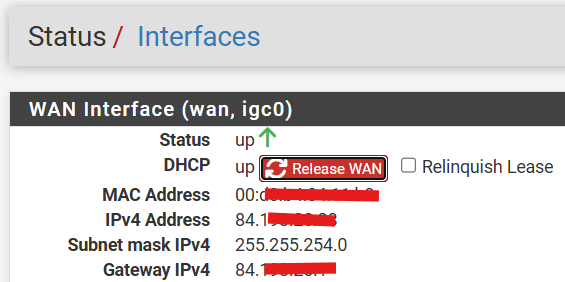
Reboot pfSense or renew the WAN DHCP lease. Then verify that pfSense received a public IPv4 address on its WAN interface.
In my case, pfSense successfully received a public IPv4 address on WAN:
After pfSense is working, reboot the Telenet modem once as a final persistence test. This confirms that the setup still works after a full modem reboot.
Post-Change Test Checklist
- The normal Telenet Wi-Fi/hotspot still works.
- The Telenet TV box or decoder still works.
- Clients behind pfSense have internet access.
- Clients behind pfSense browse out using the public IPv4 address shown on the pfSense WAN interface.
- Inbound NAT/port-forwarding rules on pfSense, still work.
- Perform an new speedtest to see if your latency/speed improved.
Enable IPv6 on pfSense
The exact IPv6 configuration depends on your router/firewall. In this example, I use pfSense.
Step 1: Enable DHCPv6 on WAN
Go to Interfaces > WAN and set the IPv6 configuration type to DHCP6.
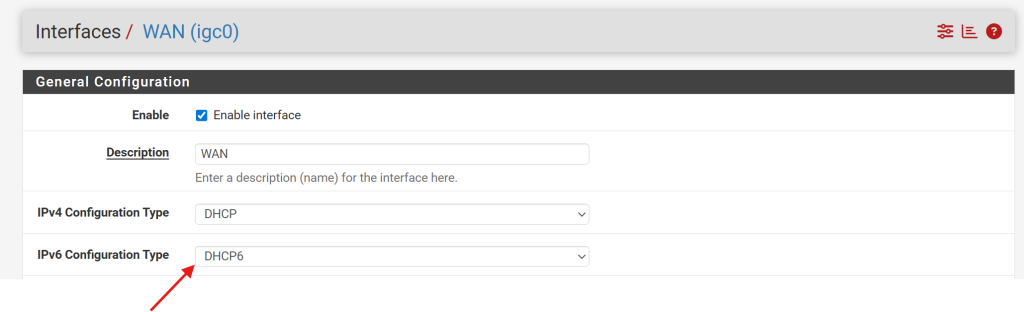
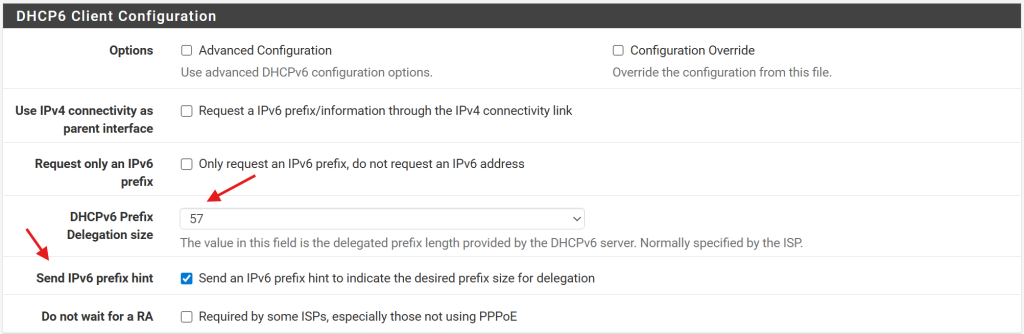
In the DHCPv6 client options, request a Prefix Delegation size of /57 and enable Send IPv6 prefix hint.
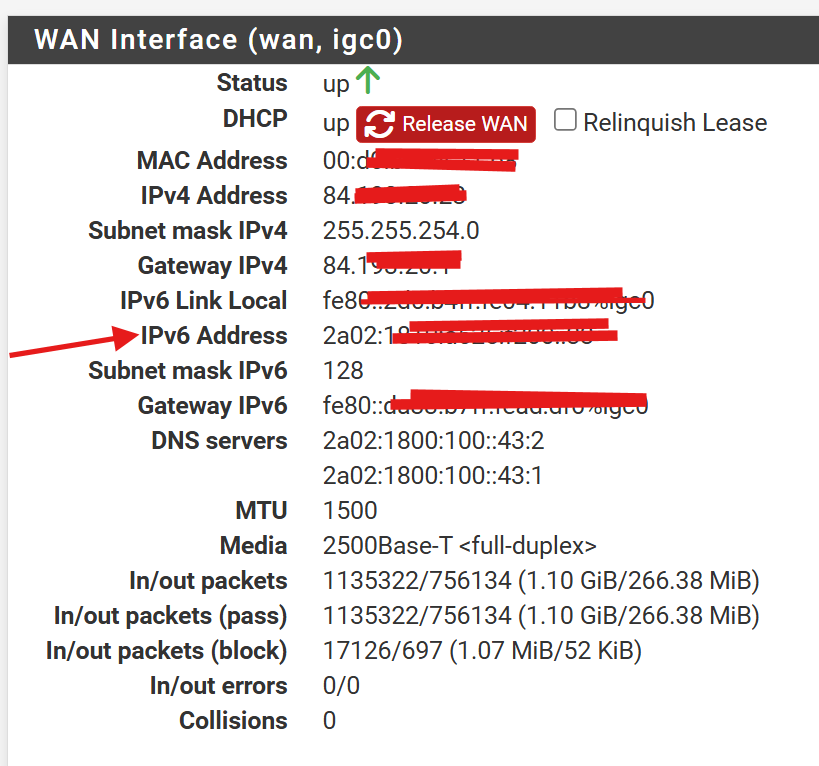
/128, while the delegated prefix is used for your LAN/VLAN interfaces. Do not confuse the WAN address with the delegated LAN prefix.You can reboot pfSense or check Status > Interfaces to verify that the WAN interface now has IPv6 information.
Step 2: Enable IPv6 on a LAN or VLAN Interface
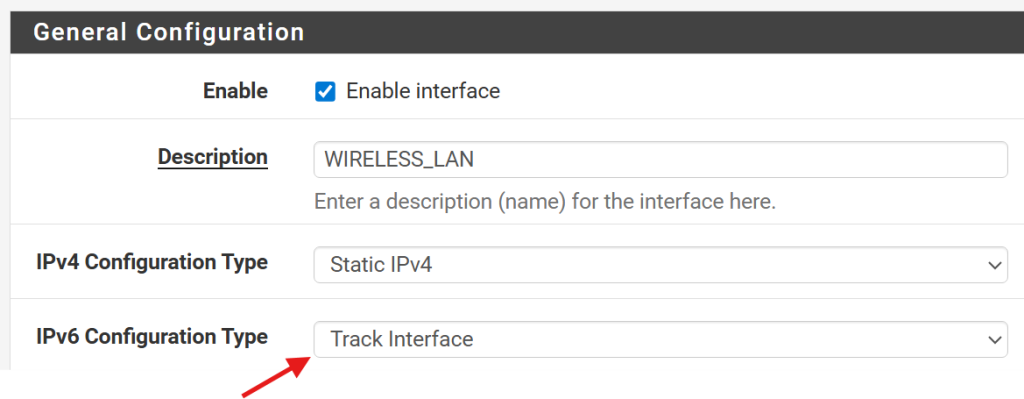
Go to the LAN/VLAN interface you want to enable for IPv6. Set the IPv6 configuration type to Track Interface.
Select WAN as the tracked interface and enter a prefix ID. For the first IPv6-enabled LAN/VLAN, use prefix ID 0.
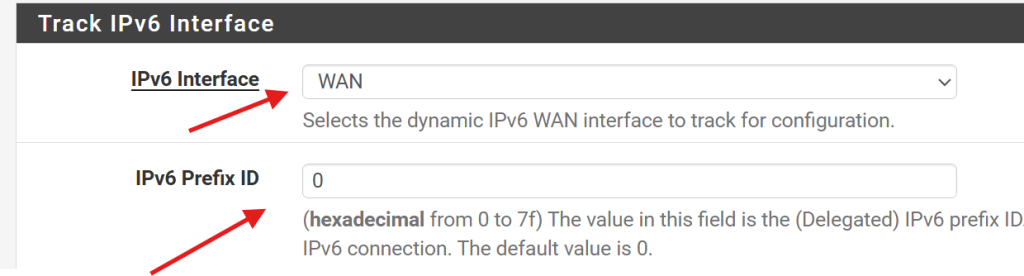
1. Do not reuse the same prefix ID on multiple LAN/VLAN interfaces.| Interface | Track interface | Example prefix ID |
|---|---|---|
| LAN | WAN | 0 |
| WIRELESS_LAN | WAN | 1 |
| GUEST | WAN | 2 |
| DMZ | WAN | 3 |
Step 3: Configure Router Advertisements
Next, go to Services > Router Advertisements for the interface and enable Assisted mode.
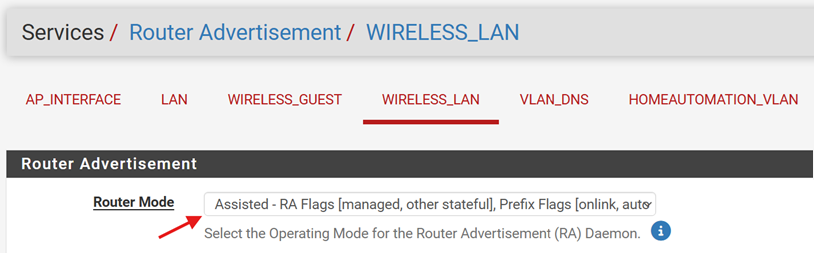
Assisted mode is useful because it allows clients to use SLAAC while also allowing DHCPv6. This is especially important on Wi-Fi networks, because not every client handles DHCPv6 the same way.
Scroll down and configure DNS for clients. In my case, my internal Pi-hole was not IPv6-ready yet, so I temporarily used Google IPv6 DNS.
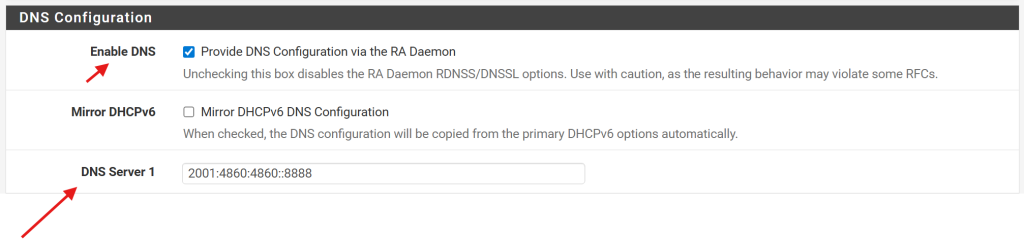
Step 4: Configure the DHCPv6 Server
Go to Services > DHCPv6 Server, select the interface and enable DHCPv6.
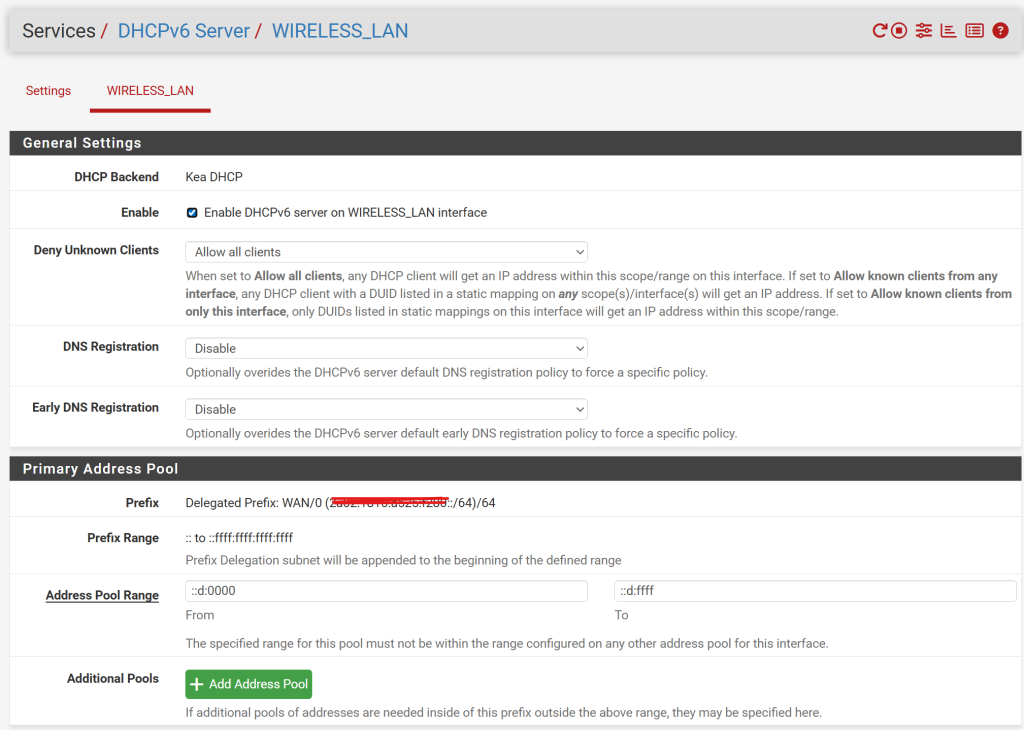
When the interface is tracking the WAN delegated prefix correctly, pfSense should show a /64 for that interface. That is what clients on that LAN/VLAN will use.
Because I noticed that some clients did not receive DNS reliably through Router Advertisements alone, I also configured the DNS server in DHCPv6.

Step 5: Check Firewall Rules
Make sure your firewall rules allow IPv6 traffic from the LAN/VLAN to the internet. For testing, you can temporarily allow IPv6 from the interface network to any destination. Tighten the rule afterwards if needed.
Action: Pass
Interface: Your LAN/VLAN interface
Address Family: IPv6
Protocol: Any
Source: This interface net
Destination: Any
Step 6: Renew the Client Address and Test
On a Windows client, renew the network configuration and inspect the result:
ipconfig /release
ipconfig /renew
ipconfig /flushdns
ipconfig /all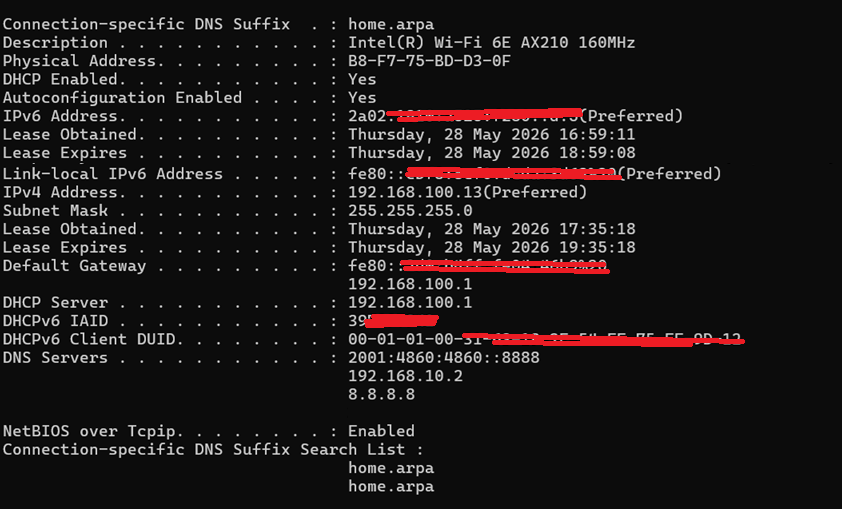
Then run a few IPv6 tests:
ping -6 google.com
nslookup gklablocal.com 2001:4860:4860::8888
tracert 2001:4860:4860::8888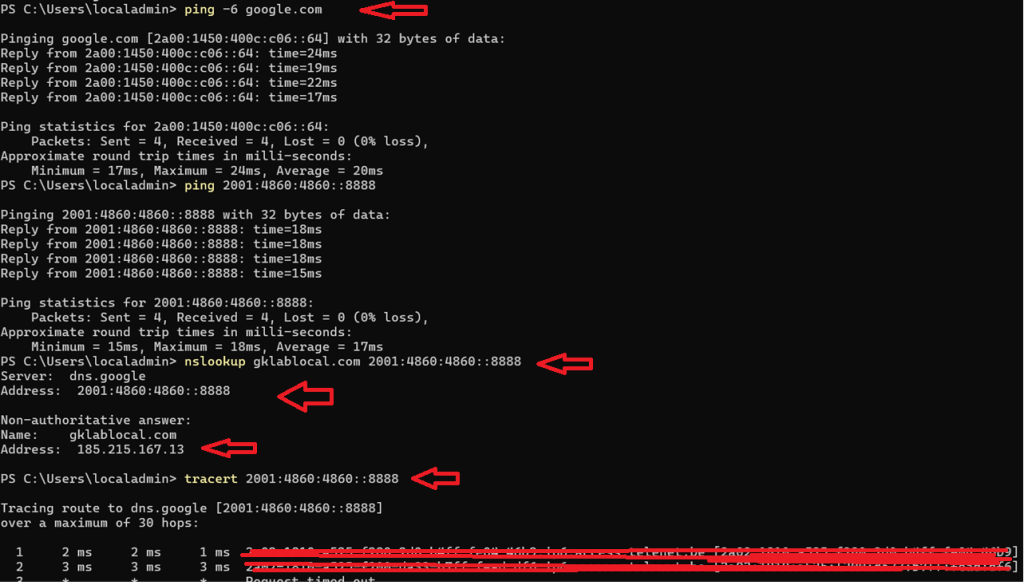
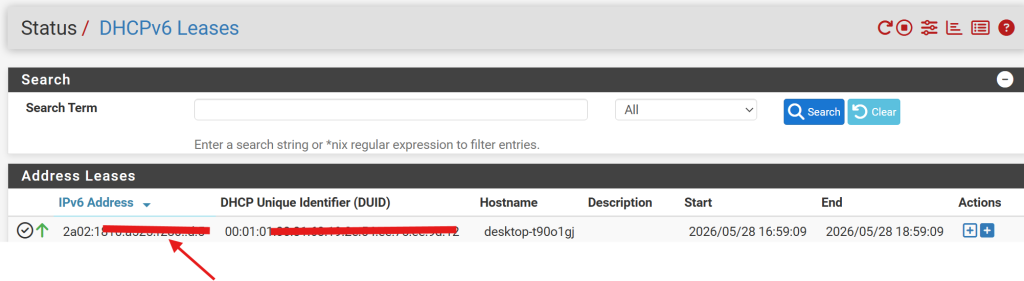
To confirm that the IPv6 address came from pfSense and not from another device, check the DHCPv6 leases under Status > DHCPv6 Leases.
Troubleshooting
| Problem | What to check |
|---|---|
| pfSense does not receive a public IPv4 address | Verify the WAN MAC address in MyTelenet, make sure pfSense WAN uses DHCP, disable DMZ-host mode and reboot/renew the WAN lease. |
| Clients have internet but still show the old public IP | Check whether clients are connected behind pfSense or still directly to the Telenet modem/router Wi-Fi. |
| IPv6 WAN works but LAN clients do not get IPv6 | Check Track Interface settings, Router Advertisements and DHCPv6 Server settings for the LAN/VLAN. |
| Second IPv6 VLAN behaves strangely | Make sure every LAN/VLAN uses a unique prefix ID. Do not reuse prefix ID 0 on multiple interfaces. |
| DNS does not work over IPv6 | Check Router Advertisement DNS settings, DHCPv6 DNS settings and firewall rules to the DNS server. |
| Inbound services still do not work | Check pfSense WAN rules, NAT/port forwards and remember that some ISP-level ports may still be blocked. |
Conclusion
After enabling Telenet MAC bridging, pfSense becomes the real edge firewall for my home/lab network. The biggest benefit is removing double NAT: pfSense receives the public IPv4 address directly, and I can manage firewall rules, NAT, VPNs and port forwards in one place.
IPv6 also works nicely with DHCPv6 Prefix Delegation. With a /57, I can create up to 128 separate /64 LAN/VLAN prefixes, which is more than enough for a home lab.